In this post we will take a look at some of the requirements to use Microsoft Graph to query Win32apps. We will talk a little bit about what it is and how to very quickly connect to the graph using Graph Explorer. We will then dive a little deeper, looking at ways to authentication against the graph and then finish up the post with some basic queries to get you started.
What is Microsoft Graph?
Have you seen the Terminator films? The Microsoft Graph is “SkyNet” – it connects to everything. The Graph is an artificial neural network-based conscious group mind and artificial general superintelligence system…wait, wrong description. It is a single endpoint, and exposes multiple REST API’s so we can access data in a multitude of Microsoft 365 services, including Intune.
There are also over 100 connectors we can use to connect to popular Microsoft and non Microsoft services like Google Drive, Amazon and more. We can even use custom Connectors to connect to our own data sources via the Graph API. More infor can be found at:
https://www.microsoft.com/microsoft-search/connectors/?category=&query=
https://docs.microsoft.com/en-us/graph/connecting-external-content-connectors-overview
Connecting to Microsoft Graph
There are a number of ways to connect to Microsoft Graph and this post will heavily focus on the “proper” way. That previous statement was written in jest. As long as you get the data you need it really doesn’t matter how you connect to the Graph or manipulate data. A real simple way to connect to the Graph is via Graph Explorer https://aka.ms/GE
If you are managing Intune and Win32apps there is a high probability you are using PowerShell. If that is true then you will probably either use the Graph PowerShell Module or simple use Invoke-RestMethod to connect to the Graph endpoint. I prefer to use Invoke-RestMethod to connect to the Graph because as soon as the REST API’s are exposed I can access them. When relying on the PowerShell module sometimes I need to wait for the module to be updated before newer API’s will be exposed.
Graph Query Structure
There are 3 basic pieces of information we need to query the Graph
Method
The Method determines whether we simply want to Read (GET) existing data, Modify (Patch) existing data, Add (POST) new data, Replace (PUT) existing data or Remove (DELETE) existing data.
| Method | Description |
|---|---|
| GET | Read data from a resource. |
| POST | Create a new resource, or perform an action. |
| PATCH | Update a resource with new values. |
| PUT | Replace a resource with a new one. |
| DELETE | Remove a resource. |
API Endpoint
The API Endpoint, often referred to as the version, gives us the option to connect to what is generally referred to as the Public / General Availability endpoint which exposes “well tested” Restful API’s. This endpoint is named v1.0. More cutting edge API’s are exposed with the beta endpoint for the braver admin to use. Microsoft can introduce breaking changes into the beta endpoint with little or no warning but the vast majority of admins will use the beta endpoint in day-to-day queries because of the richness those API’s bring. In fact if you are eagle eyed, you will spot the beta endpoint being used as you navigate the Microsoft Endpoint Management Admin Centre.
Resource
A resource is an entity that is exposed by the endpoint and often are defined with properties. The example below would bring back information about the user who initiated the query.
Graph Explorer
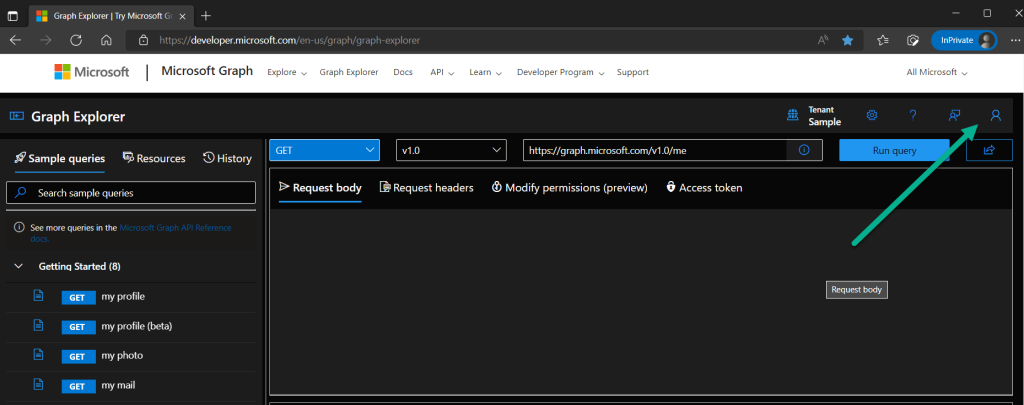
Graph Explorer is a nice way to get familiar with. By default, you will have delegated permission to view your own user object so lets see what that looks like
Navigate to https://aka.ms/ge
By Default, if we don’t sign-in, any Graph query we make will bring sample test data so go ahead and Click Sign-in.

Now that we understand a little more about the structure of a query, click Run query to see what information is exposed using the me entity
Method = GET
API Endpoint = v1.0
Resource = https://graph.microsoft.com/v1.0/me
The response of the query displays user information in the JSON format.
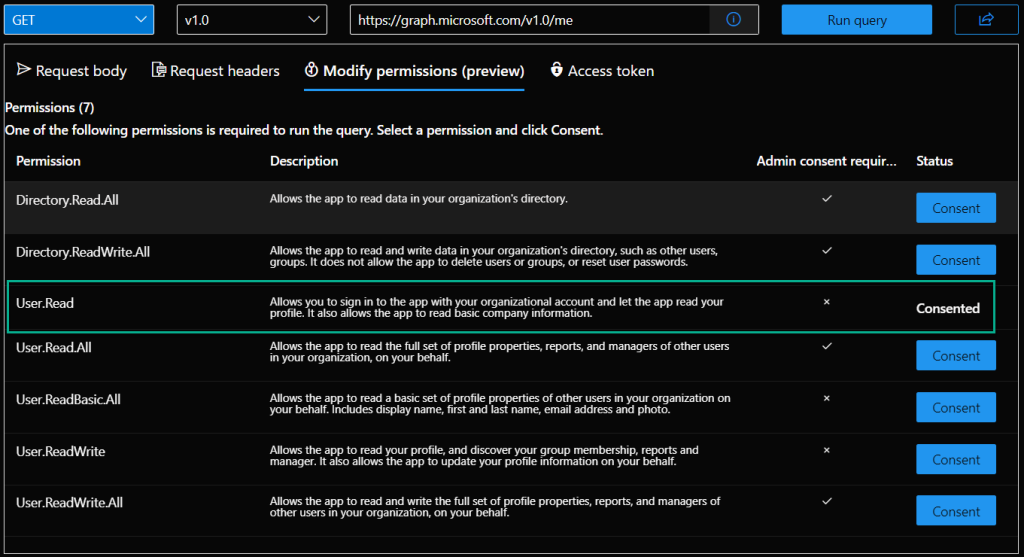
Every query still requires the user has permission to access that resource. Using Graph does not mean we automatically have access to all the data in our tenant, that would be terrible. Click Modify permissions (preview) to see what permissions were necessary to run that query.
By default, when using Graph Explorer, the signed in user has delegated permissions to Read their own data
Run the same query again but this time use the beta endpoint.
Method = GET
API Endpoint = beta
Resource = https://graph.microsoft.com/beta/me
We can even add more properties to our query as we see them exposed. Using Graph Explorer is a great way to see which properties are exposed each time we run a query.
Method = GET
API Endpoint = beta
Resource = https://graph.microsoft.com/beta/me/photo/$value
What about Win32 apps? After all that is what we want to focus on in this blog. If we simply query the deviceAppManagement/mobileApps resource we will get back a list of all apps in our Intune tenant. We can narrow that query down by filtering on a specific data type to return just Win32 apps. The filter we would use is:-
(isof(‘microsoft.graph.win32LobApp’))
Here is what a query might look like to see what Win32 apps you have configured in Intune
Method = GET
API Endpoint = beta
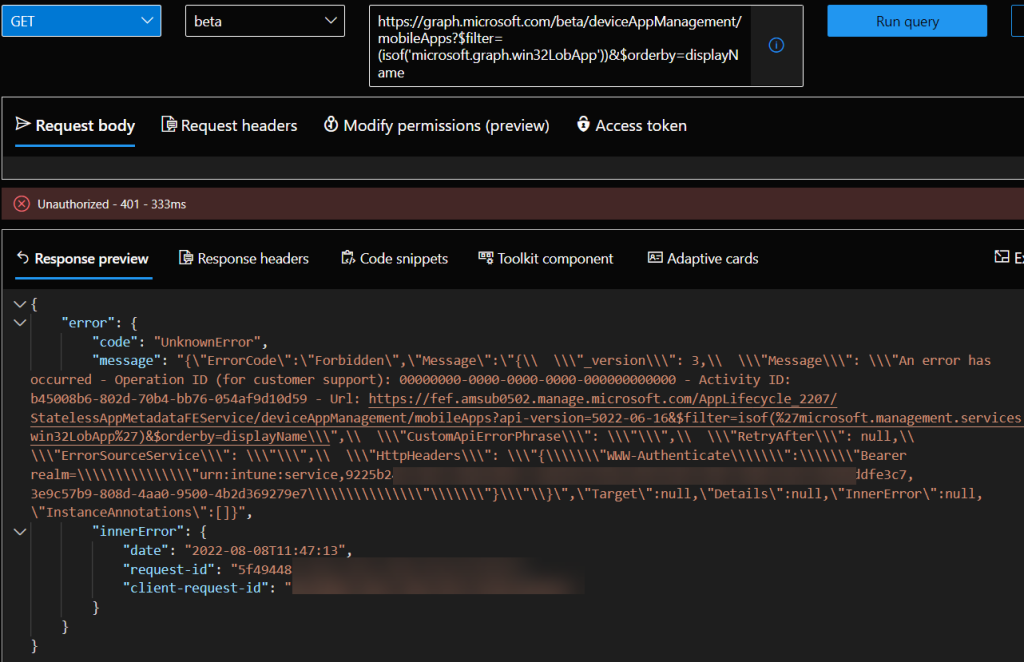
Resource = https://graph.microsoft.com/beta/deviceAppManagement/mobileApps?$filter=(isof(‘microsoft.graph.win32LobApp’))&$orderby=displayName
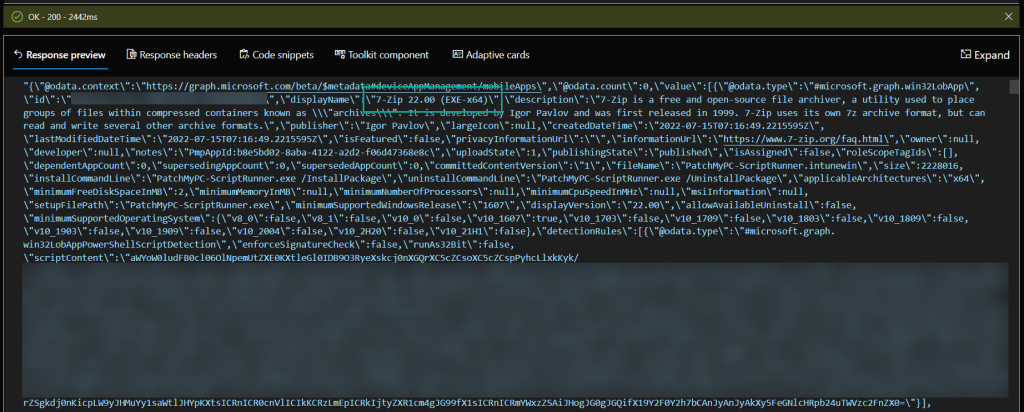
Dang It! We are unauthorized? Yes! Remember, we need to explicitly grant the signed-in user permissions to access a resource if they don’t already have permissions to do this. Admins are generally signing in with permissions required to query the Intune restful API’s but I think it was important to point this out. Run the same query again with a user who has the required, delegated permissions to Read Win32 apps data in Intune.
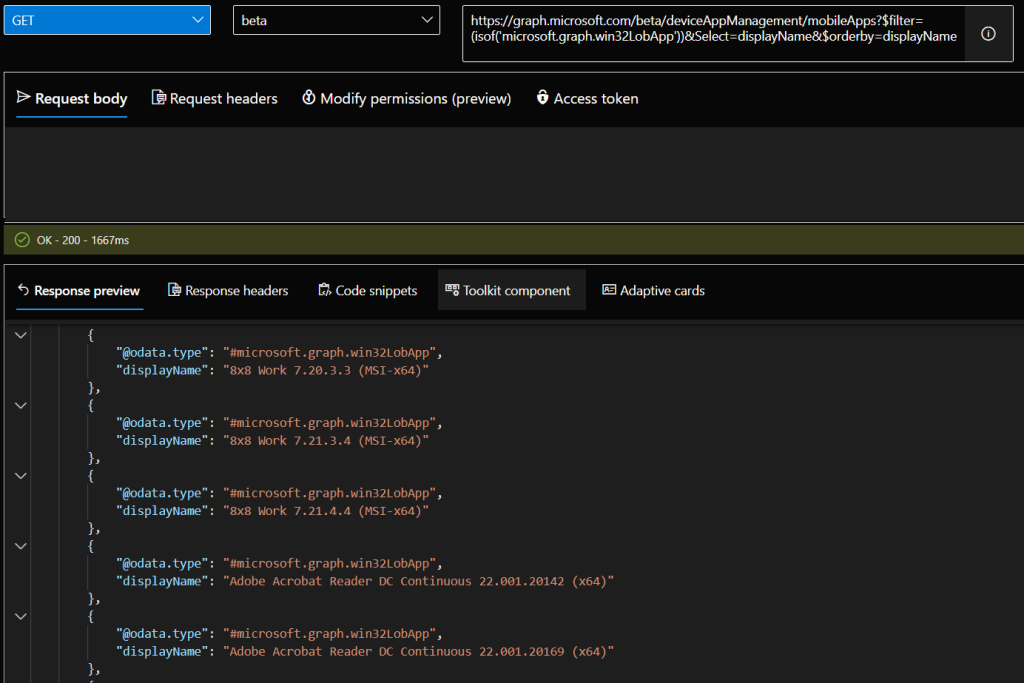
Again, we can be more specific about the data we want to select by adjusting our query. In the example below we just want to see the displayName of each result retuned by our query.
Method = GET
API Endpoint = beta
Resource = https://graph.microsoft.com/beta/deviceAppManagement/mobileApps?$filter=(isof(‘microsoft.graph.win32LobApp’))&Select=displayName&$orderby=displayName
Entra ID App Registration
Graph Explorer is great to familiarize yourself with queries to the Microsoft Graph but at some point you are going to want to use PowerShell to query the Microsoft Graph. To call the Graph we need need to have an access token and to get that access token we will create a new app registration in Entra ID.
1 . Navigate to Azure Active Directory at https://portal.azure.com/#view/Microsoft_AAD_IAM/ActiveDirectoryMenuBlade and click App registrations
2 . Click New registration
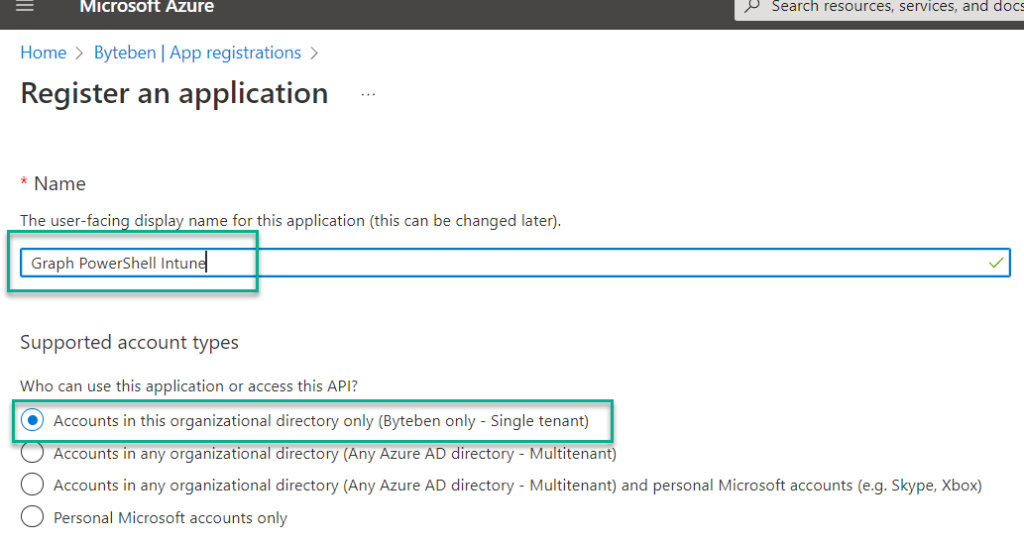
3 . Give the application a Name and leave the deafult option for Supported account types
4 . Click Register
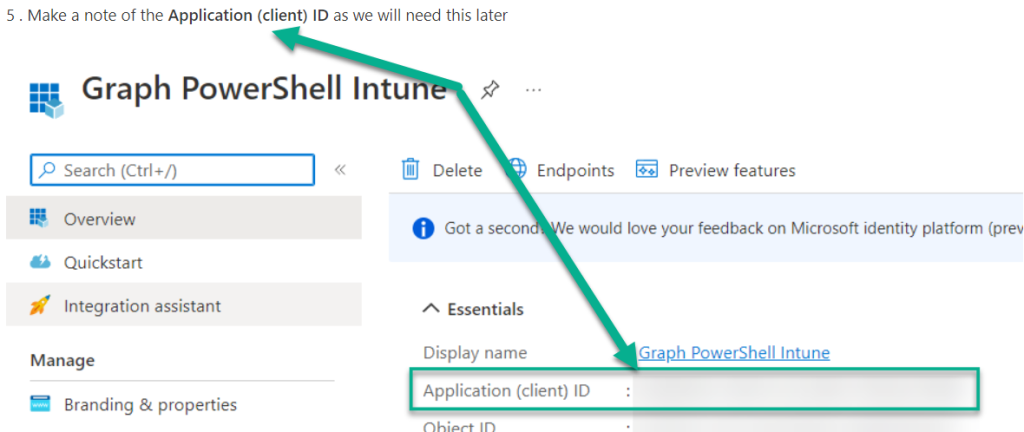
5 . Make a note of the Application (client) ID as we will need this later
6 . Select API permissions and click Add a permission
7 . On the Request API permission blade, click Microsoft Graph
8 . Now we need to choose between a Delegate permission or an Application permission. See Application vs delegated permissions for more information
We will proceed with a delegated permission as the user will be present when making calls to the Graph. When deciding which permissions to add, less is more. Only give the application permissions that it requires in Graph. If your intent is to only Read data there is no need to give the application ReadWrite permissions. Think Least Privilege every time you add a permission.
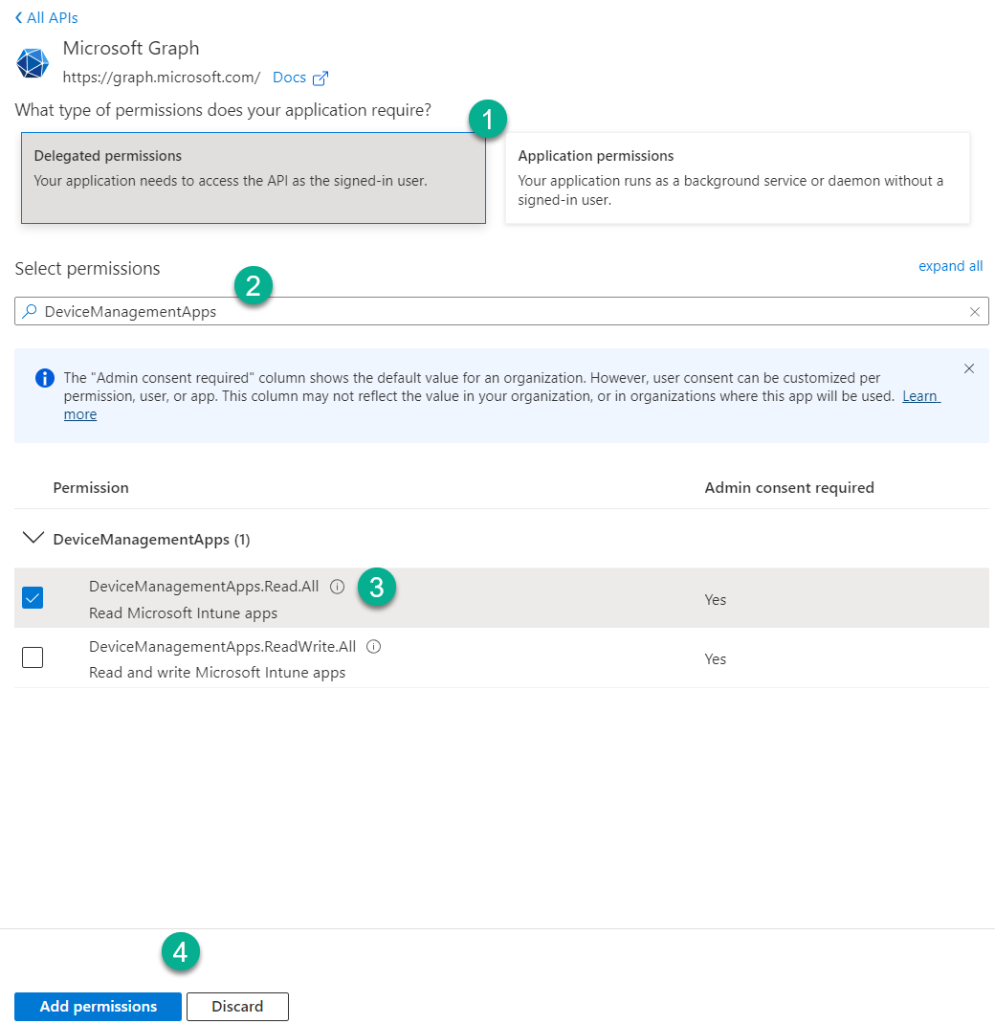
9 . Select Delegated permissions, search for DeviceManagementApps, select the permission DeviceManagementApps.Read.All and click Add permissions
We can see the new permission has been given to the application but it has not yet been granted.
10 . Click Grant admin consent for <tenant> and click Yes when prompted
To allow other delegated authentication flows like using DeviceCode, we need to add a new platform configuration
11 . Select Authentication and click Add a platform
12 . When prompted, select Mobile and desktop applications
13 . Select the oauth2/nativeclient URI and click Configure
14 . Toggle Yes to Allow public client flows and click Save
Application vs delegated permissions
The main difference here is that delegated permissions are used for a user who is actually signed in and authenticating and an application permission is used by an app/service where a user is not present. Some permissions are explicit to each permission type and some permissions are available to both permission types.
In this blog we will be focusing on delegated permissions, assuming that an admin will be interacting with PowerShell to make the Graph calls. Application permissions require authentication with a Client Secret or Certificate, instead of user authentication, and are useful for automation and services. That being said it can be useful, when testing, to use the application permission type to avoid constantly grabbing refresh tokens for authentication purposes.
An important thing to point out here is that a delegated permission on the application cannot elevate the signed in users permission. The signed in user will require the necessary role(s) to perform the function of the query.
Delegated permissions on the application must be granted by an Administrator and this is commonly referred to as Granting Admin Consent.
More information on delegated and application permissions can be found at https://docs.microsoft.com/en-us/graph/auth/auth-concepts
Authentication and Token Issuance
As we outlined earlier, to call the Graph our application needs to have a valid access token. As we are using delegated authentication in our blog, the user will authenticate interactively to get that token. The easiest way to do facilitate this in PowerShell is to leverage the module MSAL.PS
First we need to install the MSAL.PS module from the PowerShell gallery. This is as simple as running the command
Install-Module -Name "MSAL.PS" -Scope "CurrentUser"
Once the module is installed, we will use the Get-MsalToken cmdlet to obtain a token, interactively. There are some parameters that are required in order to do this. Remember the app Registration we created earlier?
We are also going to need the tenant name at this point too
Get-MsalToken -ClientId <<YourClientIDHere>> -TenantId "bytebenlab.com"
This command will pop an interactive authentication. Once the user has authenticated, a token will be issued
The token contains some interesting information. We can see the user who authenticated for the token and what permissions/Scopes they have with that token.
The Token lifetime is managed by policy in AzureAD. You can read more about Token lifetimes at https://docs.microsoft.com/en-us/azure/active-directory/develop/active-directory-configurable-token-lifetimes#token-lifetime-policies-for-access-saml-and-id-tokens
Get-Token.ps1
If you want a handy script to use across multiple tenants, check the example below. It will do the following install the MSAL.ps if it is missing, connect to the tenant/app registration specified and get a token. The token is saved to an object called $AuthToken. Replace TenantID and ClientID with values from your tenant
<#
.SYNOPSIS
    This script can be used to obtain an authnetication token

.DESCRIPTION
    This script will use the MSAL.PS PowerShell module to obtain an authentication token which can be used when scripting with Microsoft Graph

.NOTES

    FileName:    Get-Token.ps1
    Author:      Ben Whitmore
    Contact:     @byteben
    Date:        7th August 2022

.PARAMETER TenantName
Specify the tenant name to connect to e.g bytebenlab.com

.PARAMETER Context
Specify whether the token should be obtained interactively or with a device code. Valid contexts are "Interactive" and "DeviceCode"

.PARAMETER ClientID
Specify the Azure app registration to use

.EXAMPLE
Get-Token.ps1 -TenantName 'bytebenlab.com' -Context 'Interactive' -Scope 'CurrentUser' -ClientID '9a5663eb-7dd3-41c6-80a2-70ba3e7cfbdf'

#>
[cmdletbinding()]
Param (
    [Parameter()]
    [ValidateNotNullOrEmpty()]
    [String]$TenantName = "bytebenlab.com",
    [String]$ClientID = "9a5663eb-7dd3-41c6-80a2-70ba3e7cfbdf", #Replace with the CLientID from your Azure app registration
    [Parameter()]
    [ValidateNotNullOrEmpty()]
    [ValidateSet('DeviceCode', 'Interactive')]
    [String]$Context = "Interactive",
    [Parameter()]
    [ValidateNotNullOrEmpty()]
    [ValidateSet('CurrentUser', 'AllUsers')]
    [String]$Scope = "CurrentUser"

)
Function Get-ReqModule {
    Param (
        [Parameter(Mandatory)]
        [String]$ModuleName,
        [Parameter(Mandatory)]
        [ValidateNotNullOrEmpty()]
        [ValidateSet('CurrentUser', 'AllUsers')]
        [String]$Scope,
        [Parameter()]
        [Switch]$Install
    )

    #Check if module is installed
    $ModuleStatus = Get-Module -Name $ModuleName

    If (-not($ModuleStatus)) {
        Write-Verbose "$($ModuleName) is not currently installed"

        If ($Install) {

            #Install module
            Write-Verbose "Installing $($Module)"
            Try {
                Install-Module -Name $ModuleName -Scope $Scope
            }
            Catch {
                Write-Verbose "Error installing $($ModuleName)"
                $_
                break
            }
        }
    }
    else {
        Write-Verbose "$($ModuleName) is installed"
    }
}

#Set Application to use
$Module = "MSAL.PS"

#Set Verbose Level
$VerbosePreference = "Continue"
#$VerbosePreference = "SilentlyContinue"

#Check required modules are installed, if not install them
Get-ReqModule -ModuleName $Module -Scope $Scope -Install

#Build auth params
$AuthParams = @{
    ClientId = $ClientID
    TenantId = $TenantName
    $Context = $true
}

#Get a Token
$AuthToken = Get-MsalToken @AuthParams

#Display Access Token to be used for Graph API requests
$AuthToken.AccessToken
Invoke-RestMethod
We have an app registration and we have a token – let’s go play! Earlier we looked at Graph Explorer and saw how easy it was to send queries to the Microsoft Graph. Well using PowerShell is just as simple. We just need the correct syntax to build a request to send to the Graph.
Like Graph Explorer, we need to send a Method. specify which Endpoint we want to connect to and what Resource we would like. Graph Explorer handled authentication for us when we signed into the web site. When we use PowerShell, we also need to send an authorization header with the request which contains the Access Token we just received.
The Authentication header would look something like this, assuming we use the $AuthToken object that was output from the Get-Token.ps1 script we just looked at. We can splat that HashTable into Invoke-RestMethod.
Headers @{Authorization = "Bearer $($AuthToken.AccessToken)"}
Putting a complete request together would look something like this
Invoke-RestMethod -Headers @{Authorization = "Bearer $($AuthToken.AccessToken)"} -Method GET -Uri "https://graph.microsoft.com/v1.0/me"
Lets try that again but get something meaningful back, like Win32app data
Invoke-RestMethod -Headers @{Authorization = "Bearer $($AuthToken.AccessToken)"} -Method GET -Uri "https://graph.microsoft.com/beta/deviceAppManagement/mobileApps?$filter=(isof('microsoft.graph.win32LobApp'))&$orderby=displayName"

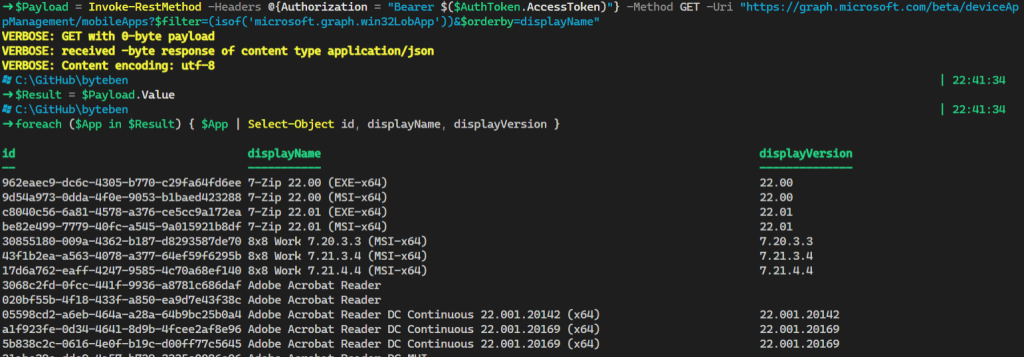
As with all things in PowerShell, if we want to start manipulating this data it is easier if we create an object from it
$Payload = Invoke-RestMethod -Headers @{Authorization = "Bearer $($AuthToken.AccessToken)"} -Method GET -Uri "https://graph.microsoft.com/beta/deviceAppManagement/mobileApps?$filter=(isof('microsoft.graph.win32LobApp'))&$orderby=displayName"
$Result = $Payload.Value
foreach ($App in $Result) { $App | Select-Object id, displayName, displayVersion }

Functions FTW
As you start to get more familiar this, you probably don’t want to build out the RestMethod Graph call manually each time. Functions are a real nice way to do a lot of the heavy lifting for you so you can just focus on the correct Resource to query. Because we are working with Win32apps and specifically the GET method in this post, the sample function below will create the Graph call for us, we just need to specify the Resource URI and App we want to query. The example will show you how you can start to bring PowerShell variables into the mix to dynamically build out URI strings.
Building URI’s in PowerShell is fun (said no one ever). We need to mindful of characters that may escape our URI. A classic example of this is if we try and pass the app name “Notepad++” in our URI. We need to make sure the AppName is URL Encoded to avoid an invalid URI.
Function to URL Encode a String (Thanks Ben@powers_hell)
Function ConvertTo-UrlEncodedString {
    [cmdletbinding()]
    param (
        [parameter(mandatory = $true)]
        [string]$AppName
    )

    #Double Encode String
    $EncodedString = [System.Web.HttpUtility]::UrlEncode($AppName)
    return $EncodedString

}
Function to Create Graph Call
Function Create-GraphCall {
    Param (
        [Parameter()]
        [String]$ResourceURI,
        [String]$AppName,
        [String]$Method = "GET",
    	[String]$APIEndpoint = "beta"
    )

    #URL Double Encode escaping characters
  If ($AppName) {
        $AppNameEncoded = ConvertTo-UrlEncodedString $AppName
        $ResourceURI = $ResourceURI.replace('$AppName', $AppNameEncoded)
    }

    $GraphParams = @{

        Headers = @{
            "Content-Type"  = "application/json"
            "Authorization" = "$($AuthToken.AccessToken)"
        }
        Method  = $Method
        URI     = "https://graph.microsoft.com/$($APIEndpoint)/$($ResourceURI)"
    }
    Return $GraphParams
}
With these two functions in place, we can now pass a few, simple lines of code to make our Graph calls and render the result
$AppName = "Notepad++"
$ResourceURI = "deviceAppManagement/mobileApps?filter=(isof('microsoft.graph.win32LobApp'))&search=`"`$AppName`"&orderby=displayName"

$Payload = (Create-GraphCall -ResourceURI $ResourceURI -AppName $AppName)
Write-Verbose "Created URI: ($($Payload.Method)) $($Payload.URI)" -Verbose
$Result = (Invoke-RestMethod @Payload).Value
foreach ($App in $Result) { $App | Select-Object id, displayName, displayVersion }

The above example will URL Encode the $AppName variable and insert it into the URI correctly. Notice that when we use PowerShell to construct URI’s, we need to be mindful of characters/variables we don’t want to resolve automatically – hence the backtick is used.
We only need to use backticks when manipulating the URI strings with PowerShell.
When connecting to the beta endpoint, it is not necessary to prefix the dollar symbol in queries.
V1.0 Endpoint URI: $ResourceURI = “deviceAppManagement/mobileApps?$filter=(isof(‘microsoft.graph.win32LobApp’))&$search="$AppName`”&$orderby=displayName”
Beta Endpoint URI: $ResourceURI = “deviceAppManagement/mobileApps?filter=(isof(‘microsoft.graph.win32LobApp’))&search="$AppName`”&orderby=displayName”
Graph X-Ray
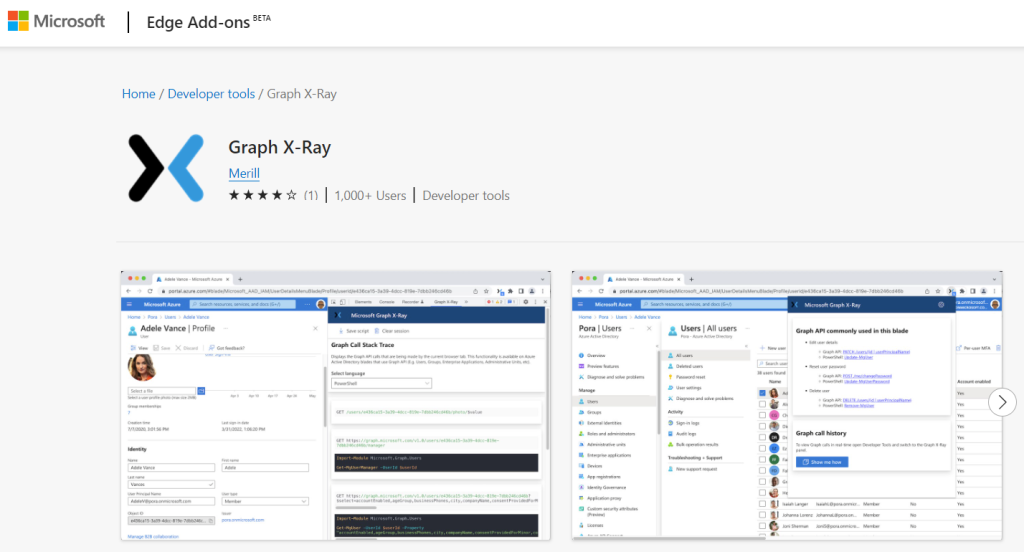
We have the foundation to build out our queries now but sometimes it can be difficult to understand what resources/entities we can query. Graph-Xray is an awesome plugin for Microsoft Edge that makes it really easy to discover them. Simple install the Graph X-Ray extension
https://microsoftedge.microsoft.com/addons/detail/graph-xray/oplgganppgjhpihgciiifejplnnpodak
Once installed, press F12 to access developer tools while you navigate the Microsoft Endpoint Manager Admin Center
Select Graph X-Ray from the menu
As you access blades in the MEMAC, you will see the corresponding resource in Graph X-Ray! So so cool!
You can grab the URI to use in PowerShell for your Invoke-RestMethod call or even the command to use with the Microsoft.Graph PowerShell module
Win32app Examples
Below are some example snippets and URI’s you could use in your PowerShell queries.
Get all Win32apps
https://graph.microsoft.com/beta/deviceAppManagement/mobileApps?$filter=(isof(‘microsoft.graph.win32LobApp’))&$orderby=displayName
Get all Win32apps that begin with “Adobe”
https://graph.microsoft.com/beta/deviceAppManagement/mobileApps?$filter=(isof('microsoft.graph.win32LobApp')) and startswith(displayName,'Adobe')&$orderby=displayName
Get all Win32apps that begin contain “Adobe”
https://graph.microsoft.com/beta/deviceAppManagement/mobileApps?$filter=(isof('microsoft.graph.win32LobApp'))&$search="Adobe“&$orderby=displayName&
Get all Win32apps with a publisher of “Adobe”
https://graph.microsoft.com/v1.0/deviceAppManagement/mobileApps?$filter=(isof('microsoft.graph.win32LobApp')) and startswith(displayName,'Adobe')$orderby=displayName
Get all Win32apps that begin contain “Adobe” and were created after 1st August 2022
https://graph.microsoft.com/beta/deviceAppManagement/mobileApps?$filter=(isof(‘microsoft.graph.win32LobApp’) and createdDateTime ge 2022-08-01) and startswith(displayName,’Adobe’) &$orderby=displayName
Get all Win32apps not published by Patch My PC
https://graph.microsoft.com/v1.0/deviceAppManagement/mobileApps?$filter=(isof(‘microsoft.graph.win32LobApp’) and (not+startsWith(notes,’PmpAppId’)) and (not startsWith(notes,’PmpUpdateId’)))&$orderby=displayName
Get an image for a published Win32app
Get the id of the application first using one of the URI’s in the examples above
https://graph.microsoft.com/v1.0/deviceAppManagement/mobileApps/962eaec9-dc6c-4305-b770-c29fa64fd6ee
$uri = "https://graph.microsoft.com/v1.0/deviceAppManagement/mobileApps/962eaec9-dc6c-4305-b770-c29fa64fd6ee"
$payload = Invoke-RestMethod -Method GET -Headers $authHeader -uri $uri
$image = "$($env:temp)\$($payload.displayName).png"
[byte[]]$Bytes = [convert]::FromBase64String(($payload.largeIcon.value))
[System.IO.File]::WriteAllBytes($image,$Bytes)
Start-Process $image
Summary
In this post we introduced you to the Microsoft Graph, explained some of the high level concepts, used delegated authentication for an app and walked through some PowerShell Functions and examples that you could use to make Graph calls.
Delegated authentication is great for testing and getting familiar with calling Graph from PowerShell. When you start using PowerShell (or any other programming language) in production for unattended scripts, you should explore other authentication methods, like using a Client Secret/Certificate for the application authentication type.
Hopefully this blog post has helped you to get started on your journey of viewing Win32app data using the Microsoft Graph.
More reading on some of these topics and other useful links can be found below
Graph Explorer
Graph Explorer | Try Microsoft Graph APIs – Microsoft Graph
Graph Connectors
Microsoft Search – Intelligent search for the modern workplace
Microsoft Graph connectors overview – Microsoft Graph | Microsoft Docs
App Registration / Permissions
Quickstart: Register an app in the Microsoft identity platform – Microsoft Entra | Microsoft Docs
Microsoft identity platform scopes, permissions, & consent – Microsoft Entra | Microsoft Docs
Getting Started with Microsoft Graph
Quick Start – Microsoft Graph
Getting Started with Graph API and Graph Explorer – Developer Support (microsoft.com)
Win32app API Reference
win32LobApp resource type – Microsoft Graph v1.0 | Microsoft Docs

Ben Whitmore
Ben has worked for over two decades in the endpoint management space. He is a Microsoft Certified Trainer and a Microsoft MVP in the Enterprise Mobility category. He is an Official Contributor on the "Modern Endpoint Management" LinkedIn group with over 23k members. Ben's primary area of focus is Intune and automation.
Ben regularly blogs at byteben.com, MSEndpointMgr.com and, more recently, PatchTuesday.com.


