In today’s interconnected era, it has become increasingly common for large organizations to have multiple IT departments and workers spread across the globe. Take myself as an example: I am based in Toronto, working for a company headquartered in Colorado. My colleagues span from Australia to Belgium to the West-Coast and everywhere in between, creating a truly international work environment. To effectively manage and support these teams in various regions, many orgs choose to have IT departments spread across the globe. But when you have all these different IT departments spread across globe, how do you restrict access so that admins only have access to the devices and users in their region? Well, we can leverage the use of Intune scope tags and use them in combination with Role based access control (RBAC) to restrict what objects admins can see and also what control they have over those objects.
RBAC defines roles and their associated permissions, while Intune scope tags further restrict access to resources based on their assigned tags. By adding Intune scope tags in your role assignment, administrators can ensure that these admins can only view and manage resources that match the assigned tags.
Lets cover some basic terminology
What is RBAC (Role-Based Access Control)?
RBAC in Intune allows organizations to define different roles within an organization to grant specific permissions and privileges to users or groups in that assigned role. There are 2 types of roles in Intune: Custom roles and built-in roles.
Intune has built-in roles, see the list of roles here. You can choose to assign these roles to more than one group. Note: you will not be able to edit the permissions of a built in role.
You can also choose to create a custom role and set custom permissions. See more here. Creating a custom role is a great way to get even more granular with the permissions you set for your admins.
What are Intune Scope tags?
Intune Scope tags can be applied to Intune objects, such as devices, policies, and profiles. By applying an Intune scope tag to an Intune object, you can easily filter what objects admins have access to.
By default, all objects in Intune must have at least one scope tag. So, by default, you’ll see that any untagged objects have the “Default scope tag” assigned to it already.
What are Scope Groups?
Very simply, scope groups allow you to group users or devices together, making it easier to assign policies and settings to those groups collectively. When we go to assign an RBAC role, we can select a scope group that we want our admins to manage.
Check out this Intune training video to learn more about scope groups
Now, let’s go ahead and see how we can combine RBAC and Intune scope tags to grant specialized permissions for our Toronto IT team.
Picture this: You have offices spread across the globe. We want to grant specialized permissions to allow IT admins in our Toronto Office to manage the apps for our Toronto Devices.
To do this, it will require a few steps:
Note: This is just one example of how to do it, however there are many different variations of how you can go about doing this.
- Create a scope tag called “Toronto Office”. I will be applying this scope tag to my dynamic device group called “Toronto Devices” so any newly enrolled devices are automatically assigned this scope tag.
- Duplicate and configure the built-in Application Manager Role to allow our Toronto Admins the ability to manage applications for our Toronto device group. We will also be adding the “Toronto office” scope tag in our assignment here.
Step 1: Create a new scope tag.
The scope tag that we create can be applied to any objects in Intune. The admins that we assign in our RBAC role will have access to any objects that are tagged with this scope tag.
In this example, I’ll create a scope tag called “Toronto Office” and assign it to my dynamic group containing my Toronto devices.
Note: I have already pre-created this dynamic device group. This group contains my Toronto devices enrolled in autopilot. To read more about dynamic device groups, check out this blog
Now, let’s go ahead and create our new scope tag:
- Sign in to the Microsoft Intune Admin Center and sign in using your admin credentials.
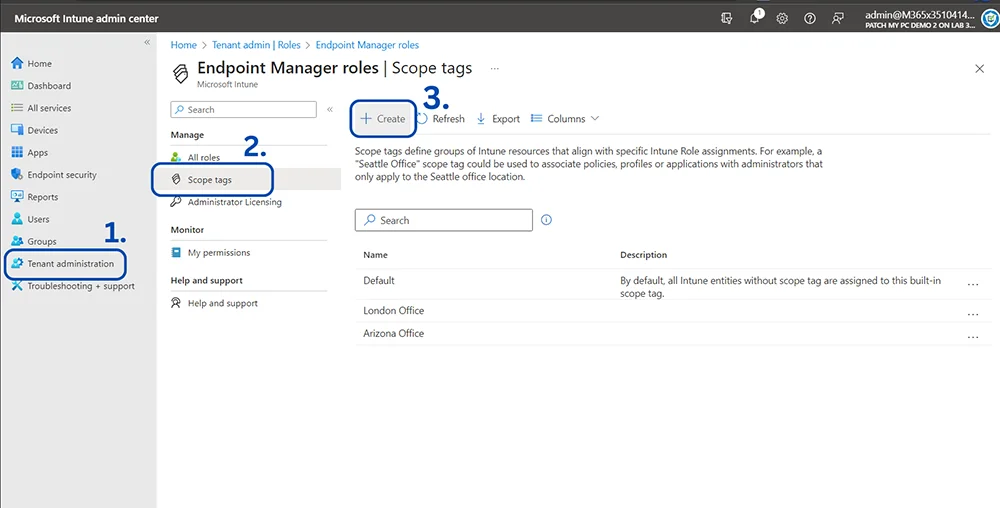
- Navigate to “Tenant Administration” From the left-hand menu
- Choose Roles > Scope tags > + Create
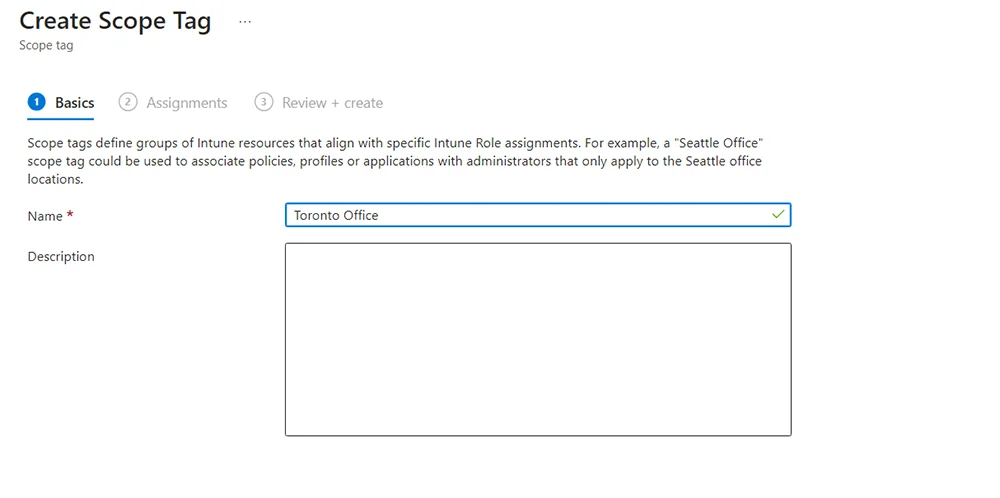
- Provide a name and description (optional). In my example, I am calling it “Toronto Office”
- In assignments, choose the Azure AD group(s) (AAD group for short) you want this scope tag to apply to. In my example, I am adding my dynamic group containing Toronto Devices.
- In Review + Create, you can review everything looks good before hitting create.
- Woohoo! We created our scope tag.
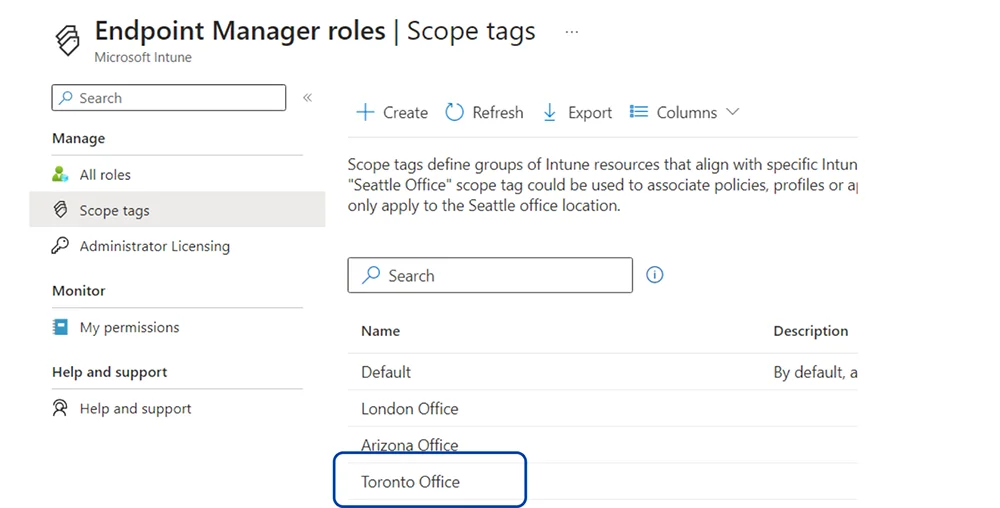
- After hitting create, you’ll see your scope tag show up in the main dash.
Step 2: Configure the RBAC role
Here you’ll choose what role you want to assign to your admins. As mentioned previously, you can choose to create a custom RBAC role, or you can assign any of the built-in roles in Intune already. You can even duplicate an existing built-in role and configure it that way – which is what i’ll be doing.
In our example, I’ll be duplicating and configuring the built-in Application Manager role. This specific role will allow admins to “Manage mobile and managed applications, read device information and view device configuration profiles.” See more about roles here.
Now, lets go ahead and duplicate and assign our Application Manager Role
- Sign in to the Microsoft Intune Admin Center and sign in using your admin credentials.
- Navigate to “Tenant Administration” From the left-hand menu.
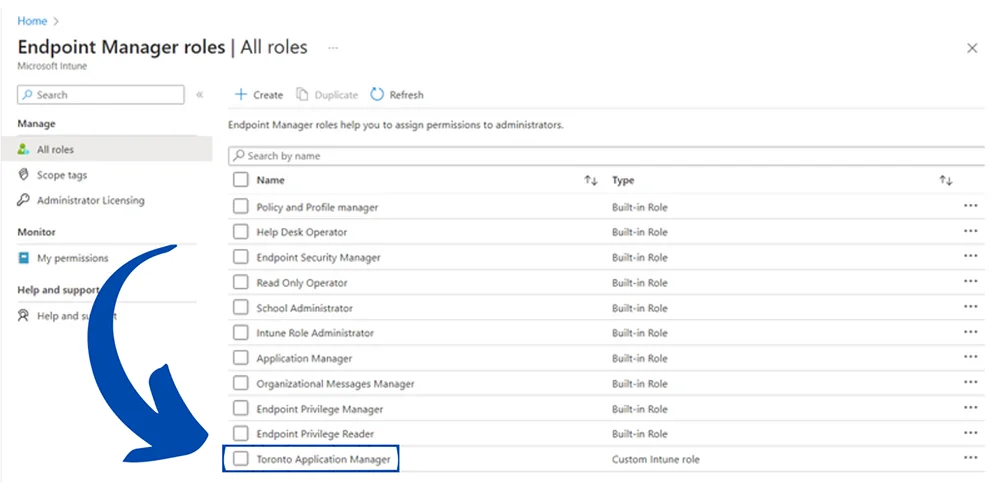
- Go to Roles > All Roles.
- Check the “Application Manager” role and then hit Duplicate in the top panel.
- In Basics, Add a name for this role. Make sure to make the assignment name clear and distinct. In this example, I’ll be naming this role “Toronto Application manager”.
- In Permissions, all the permissions that are in the default Application Manager role are enabled here. You can choose to enable or disable any of those permissions in here, and enable any addition permissions as well.
- In Scope Tags, we can leave the default scope tag as is. (We will be adding our Toronto scope tag in the next section).
- In Review & Create, you can look over all your settings before hitting the Create button.
- All done! We’ve successfully duplicated our application manager role.
Step 3: Assign the RBAC role
Now that we have our RBAC role created, lets go ahead and assign the role to our Toronto admin group.
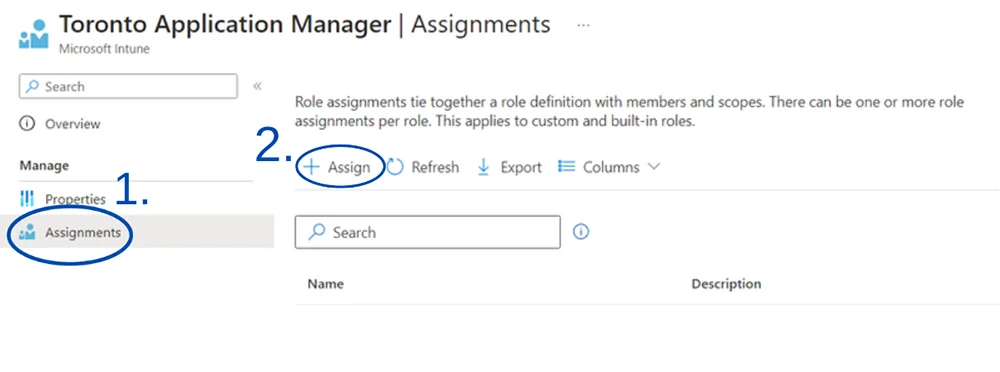
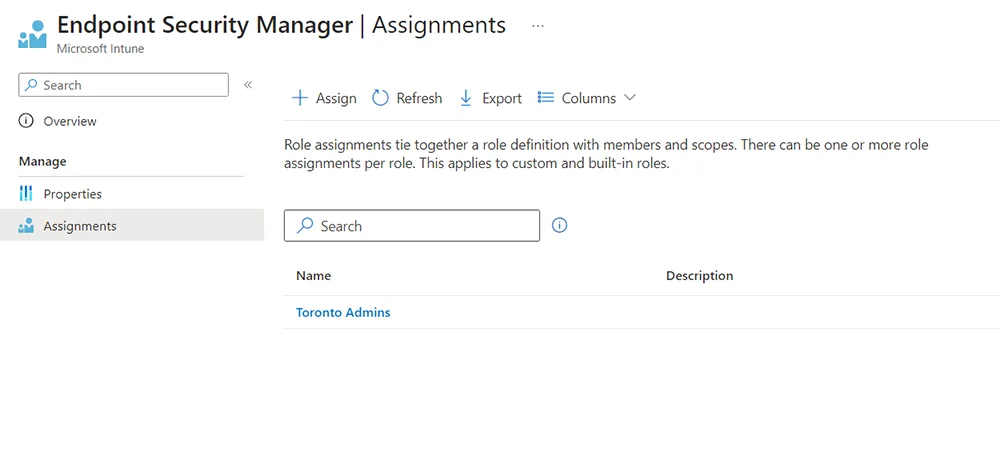
- Open up the role you want to assign. In this example, it is our Toronto Application Manager role
- On the Lefthand side, go to Assignments, then hit Assign+
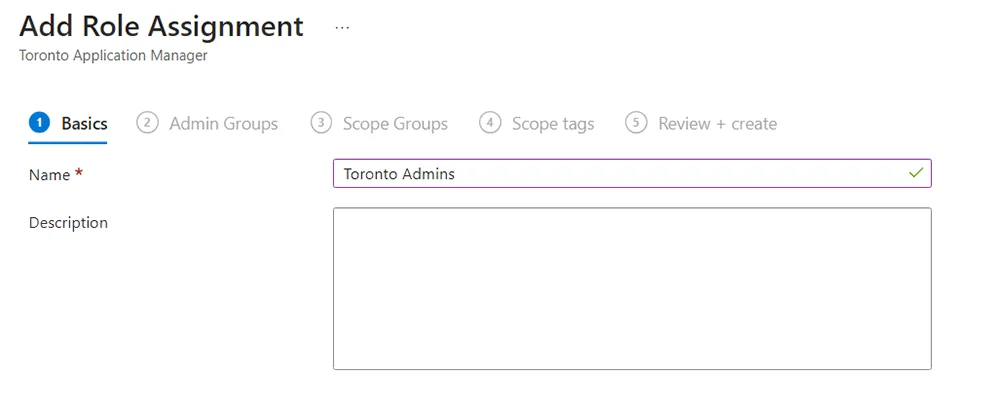
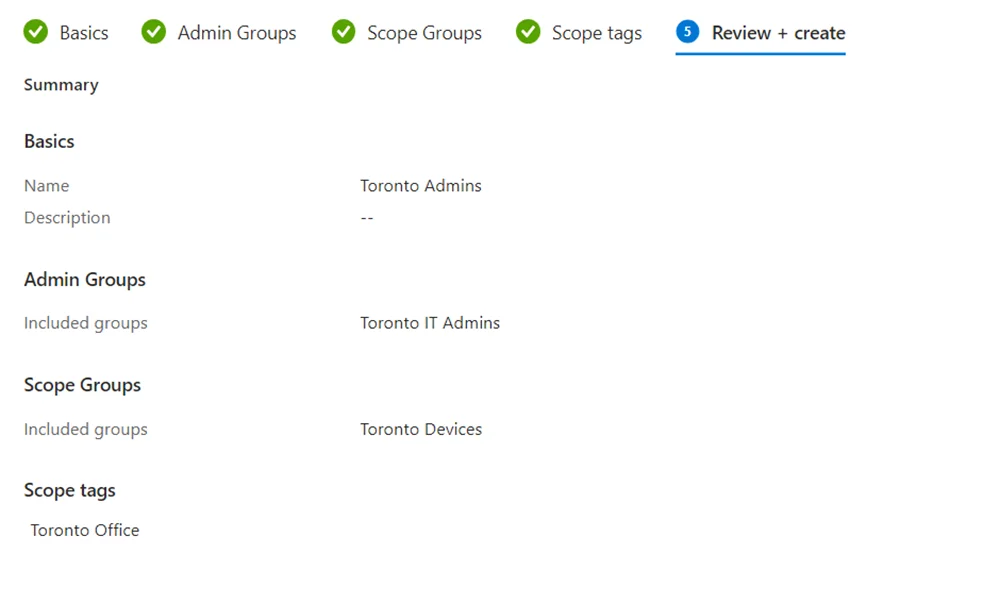
- In Basics, Add a name and description (optional). Make sure to make the assignment name clear and distinct. In this example, my assignment name is “Toronto Admins”.
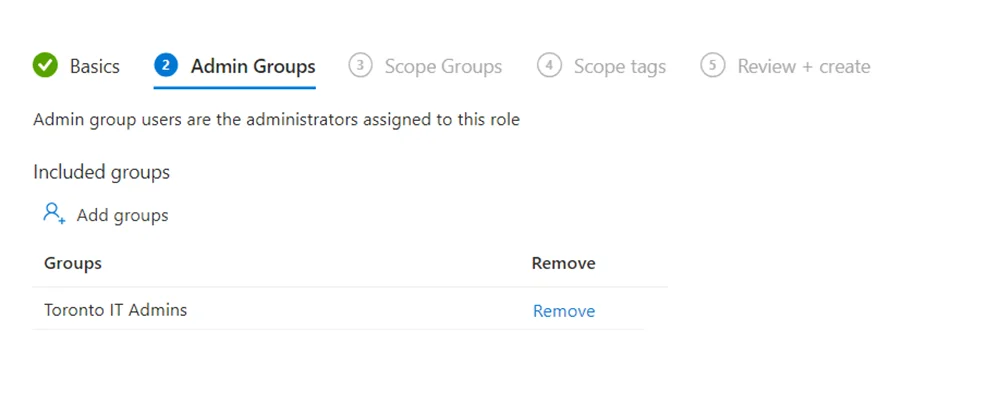
- In Admin Groups, select the group of admins you want to assign this role to. In my example, I have a group named “Toronto IT Admins” containing my Toronto Admin members.
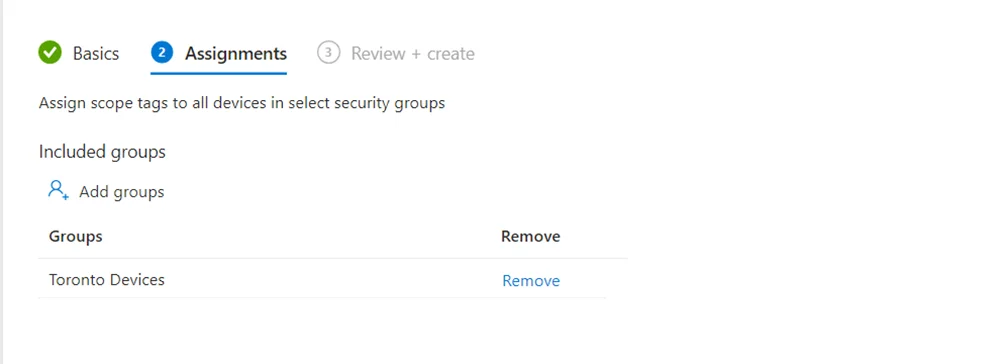
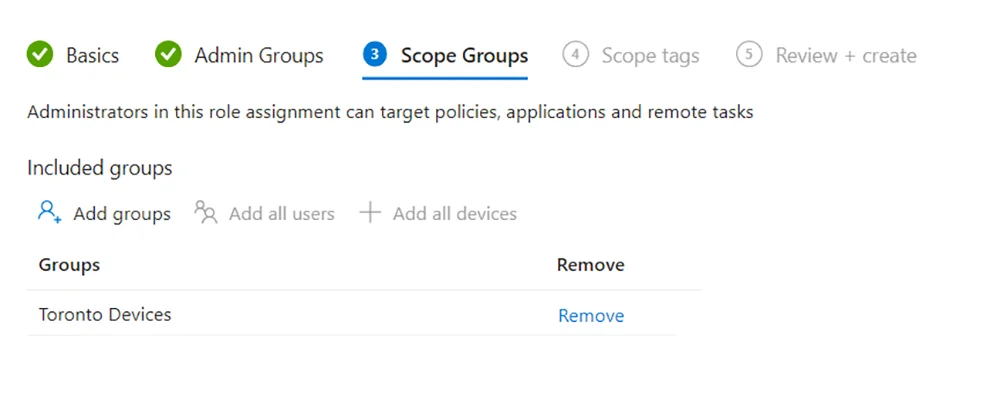
- In Scope Groups, under Included Groups, add any azure ad groups you want to allow the Admin Group (the members of the group in the previous step) to manage. In our example, I added my dynamic group “Toronto Devices”. This means that these members can have their profiles and policies managed by the Toronto Admin group.
- In Scope tags, choose the Intune scope tag you want to apply. This means that this Admin group will also have access to any Intune objects that have this scope tag assigned to it. In this example, I added my Toronto Office scope tag that I created earlier.
If you want to learn more about how to manage and assign scope tags to policies and profiles, watch this video - In review + create, you can review everything over before hitting create.
- Woohoo! We successfully assigned our Toronto Application Manager role to our Toronto Admin group.
Well… What does this all mean?
Well, we duplicated and created the Toronto Application manager role and assigned it to our Toronto Admin group. Then, to ensure they could only manage their Toronto device group, we added the “Toronto devices group” as a scope group. Remember: We assigned our scope tag to the Toronto device group when we created it. We lastly added the “Toronto Office” scope tag so the admins can view and manage any Intune objects that get tagged with the Toronto Office scope tag.
Let’s recap RBAC Roles and Intune scope tags
Hopefully by now, you can see the use of combining Intune’s Role-based-access control with Intune scope tags. Scope tags can be assigned to different policies and profiles you want your admins to have access to. Without scope tags, we wont be able to filter what objects our admins can see. Intune’s Role-based access control allows you to manage and limit what your admins can do. By combining both RBAC and Scope tags, you can control what objects specific admins have access to, as well, what control they have over them. We chose to assign our Application manager role, however you can choose to assign any role you want, or create an entirely new role to add your own permissions to. How you do it is entirely up to you, but hopefully now you understand the general concepts to get you started.

